Vor ein einiger Zeit war ich beruflich auf der Suche nach einer Alternative für das von uns genutzte Paketierungs-Framework, das auf AutoIT beruhte und bin auf PSAppDeployToolkit aufmerksam geworden.
Wofür brauche ich ein Paketierungs Framework?
Hersteller-Softwarepakete, egal ob Setup.exe oder MSI benötigen oft noch individuelle Anpassungen auf dem Zielsystem.
Teilweise lassen sich diese Anpassungen direkt als Befehlzeile mitgeben, teilweise muss man aber auch nachträglich noch Dateien einfügen, manipulieren oder Registry-Schlüssel setzen.
Dies alles, sauber protokolliert und mit allerlei Error-Handling garniert, bieten uns Paketierungsframeworks, wie das kostenlose PSAppDeployToolkit (GNU GPLv3)
Vorbereitung zur Nutzung des Toolkits
Projekt-Seite: https://psappdeploytoolkit.com/
Downloads: https://github.com/PSAppDeployToolkit/PSAppDeployToolkit/releases

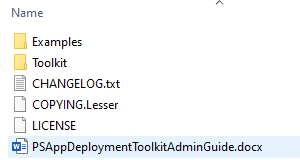
Mit dem Zip-Download erhält man:
- Ordner mit Beispielprojekten
- das Toolkit
-
ein umfganreiches Manual mit Beispiel und der Befehls-Referenz für das Toolkit
AppDeployToolkit\AppDeployToolkitConfig.xml
- die Bearbeitung ist optional, aber hier können alle Toolkit-Personalisierungen stattfinden
- ich ändere hier in der Regel nur die LogFolder
- für die Nutzung des Toolkits mit Ivanti Endpointpoint Manager (EPM) muss man leider noch an den Returncodes schrauben (dazu habe ich einen separaten Artikel geplant)

Mein erster Testfall:
Mein erster Testfall war ein Cisco Jabber Paket. Das Paket sollte sowohl für die Installation als auch für die Deinstallation genutzt werden können. Außerdem sollte bei einer Reinstallation die bisher installierte Version von Cisco Jabber, sowie alle Profileinstellungen in den Nutzerprofilen entfernt werden. Die notwendigen Befehle lassen sich in den Beispielen und der beiligenden Word-Datei finden.
Das Script:
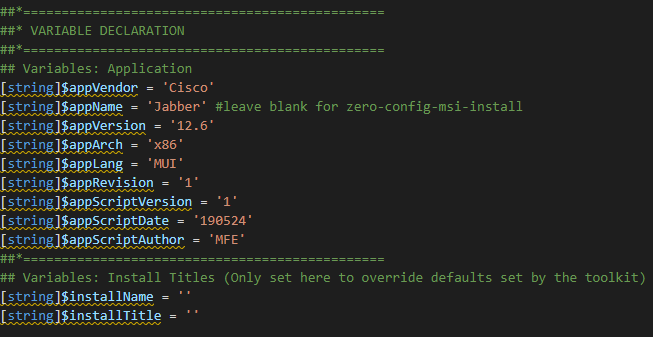
Variable Declaration
PRE-INSTALLATION:
- Close Apps + ForceCloseAppsCountdown 5
- CheckDiskSpace
- Entferne alte Version der Software
- Entferne alle Benutzerprofile
Show-InstallationWelcome -CloseApps 'CiscoJabber' -CheckDiskSpace -ForceCloseAppsCountdown 5 -Silent
Close Apps + ForceCloseAppsCountdown 5
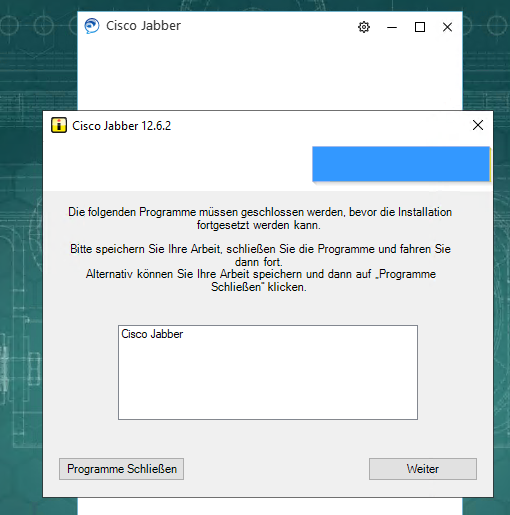
CheckDiskSpace
- manueller Wert oder einer der sich aus der größe des Installationspakets automatisch ergibt
- -ForceCloseAppsCountdown
Option to provide a countdown in seconds until the specified applications are automatically closed regardless of whether deferral is allowed.
Entferne alte Version der Software
Remove-MSIApplications -Name 'Cisco Jabber' -PassThru
-> Enfernt alle Applikationen die via Windows Installer (MSI) mit dem Namen zu finden sind
Entferne alle Benutzerprofile
$ProfilePaths = Get-UserProfiles -ExcludeSystemProfiles $true -ExcludeDefaultUser $true | Select-Object -ExpandProperty 'ProfilePath'
        ForEach ($Profile in $ProfilePaths) {
            Remove-Folder -Path "$Profile\AppData\Roaming\Cisco\Unified Communications"
            Remove-Folder -Path "$Profile\AppData\Local\Cisco\Unified Communications"
        }
-> Um alle Benutzerprofile zu finden und zu bereinigen nutze ich: Get-UserProfiles, eine Funktion aus dem Tookit, der Rest ist einfach nur Powershell. Get the User Profile Path, User Account Sid, and the User Account Name for all users that log onto the machine and also the Default User (which does not log on).
INSTALLATION
Execute-MSI -Action 'Install' -Path 'CiscoJabberSetup.msi' -Parameters '/qn CLEAR=1 SERVICES_DOMAIN=uc.mydomain.de VOICE_SERVICES_DOMAIN=uc.mydomain.de EXCLUDED_SERVICES=WEBEX UPN_DISCOVERY_ENABLED=false'
POST-INSTALLATION
{<# Show-InstallationPrompt -Message 'You can customize text to appear at the end of an install or remove it completely for unattended installations.' -ButtonRightText 'OK' -Icon Information -NoWait #>}
-> Wenn man nach der Installation keine weiteren Schritte durchführen muss (wie in meinem Beispiel) Kann man diesen Abschnitt einfach auskommentieren. Achtung: die }-Klammer am Ende muss bleiben.
UNINSTALLATION
Nochmal das gleiche wie beim CleanUp in der PRE-Installation
# <Perform Uninstallation tasks here>
Remove-MSIApplications -Name 'Cisco Jabber' -PassThru

$ProfilePaths = Get-UserProfiles -ExcludeSystemProfiles $true -ExcludeDefaultUser $true | Select-Object -ExpandProperty 'ProfilePath'
ForEach ($Profile in $ProfilePaths) {
    Remove-Folder -Path "$Profile\AppData\Roaming\Cisco\Unified Communications"
    Remove-Folder -Path "$Profile\AppData\Local\Cisco\Unified Communications"
        }
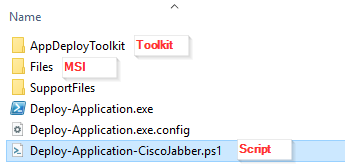
Das komplette Verzeichnis sieht dann bei mir z.B. so aus:
Troubleshooting
Fürs erste Troubleshooting gehe ich gern an einen Testrechner und öffne eine ISE als Administrator. Dort lade ich das Script Deploy-Application.ps1 (Deploy-Application-CiscoJabber.ps1 im Beispiel) und führe es einfach aus. In der ISE Console kann man nun wunderbar den Scriptablauf und das umfangreiche Logging beobachten.
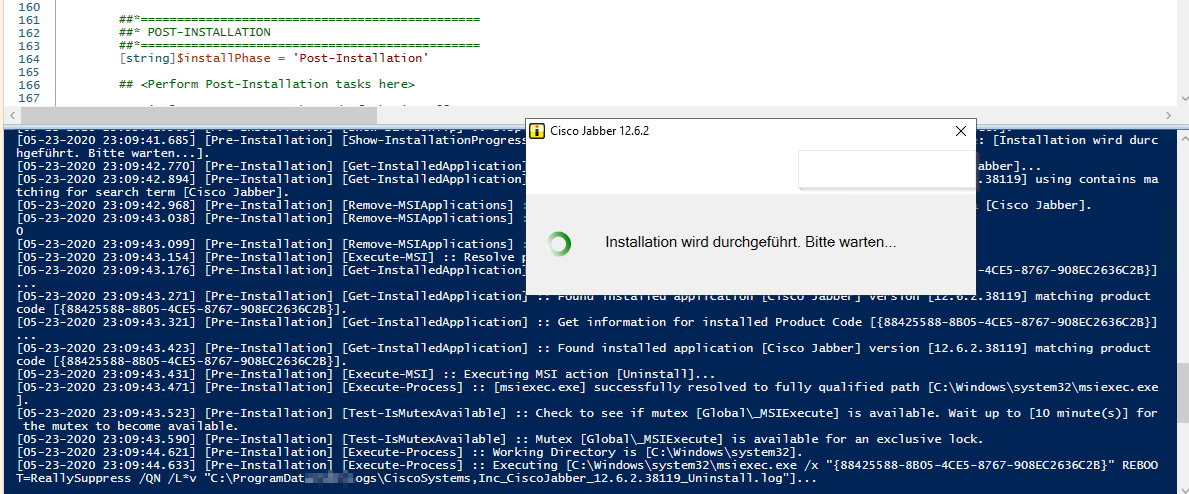
Wie man sieht funktioniert das Deployment via PS1 ausgezeichnet.
Run Install
Um Problemen mit der Execution-Policy aus dem Weg zu gehen nutze ich aber auch gern die mitgelieferte Deploy-Application.exe + Commandline:
Deploy-Application.exe .\Deploy-Application-CiscoJabber-Update.ps1 -DeploymentType "Install" -AllowRebootPassThru”
Run Uninstall
Deploy-Application.exe .\Deploy-Application-CiscoJabber-Update.ps1 -DeploymentType "UnInstall" -AllowRebootPassThru”